How to Perform A Headphone and Mic Test on Your Windows PC
By Carrie Tsai, Last Updated: December 15, 2020HOW TO
"So awkward! I just began to make a video chat with one of my customers on my Windows but my headphone wasn't working, which ruined the conversation. Anyway, do a headphone and mic test on your PC before the audio chat!"
Few things can be more annoying than having your headphones or microphone or both not working properly with your Windows PC when you just start an important and urgent audio conversation with others.
Today, headphones and microphones have become the essential tools for audio communication such as voice talking, audio chats, and gaming conversation on every PC. However, with even the best headphone along with the best microphone or the best headset, you still cannot enjoy the best audio experience if they don't work properly on your PC. In fact, headphone or microphone not working on Windows PC is a very common issue and can be due to the headphone or microphone itself or other causes.
Hence, it's of great necessity to perform a headphone and microphone test to check if they are working properly prior to making an audio conversation. The following will guide you on how to do the test step by step and also provide you with some useful tips on how to fix not working issues. Keep checking.
Also Read:
Solved: 5 Methods on How to Play Windows Games on Mac
Gaming Headset VS Headphones: How to Choose for PC Gaming
How to Connect Your Bluetooth Headset to Nintendo Switch
How to Fix Earbuds by Your Own While Only One of Earbuds Working
Headphones VS Earbuds: What's the Difference and How to Choose
Risks You Should Know When Wearing Headsets
How to Perform A Headphone Test on Your Windows PC
Doing a headphone test before using the WIndows audio controls to check if your headphone sound is working properly with your Windows PC can help bring a hindrance-free audio listening and communicating experience. The test is actually easy and simple with just a few steps:
STEP 1. Connect Your Headphones to Your Windows PC
At first, in order to test your headphones on your Windows PC, you should start by connecting your headphones to the PC. Due to the diversity of available headphone plugs and PC ports, it's easy to get the connection wrong if you cannot identify these plugs and ports for audio.
In order to help you make the right connection, the following explores the three major connecting options. Follow the option which suits your headphones and your PC to do the connection:
* 3.5mm Audio Jack
Relatively traditional and cheaper headphones usually come with a 3.5mm headphone jack (some are with two jacks split the cable at the end) at the end of the cable. If you find that your headphones are with an audio jack, plug it into the audio-out jack on your PC which is usually located in the side or front of laptops.
* USB Connection
If your headphones are USB-powered, in order to successfully perform a test of it on your Windows PC, you need to insert the USB plug into an available USB port or USB C port on your PC and then wait for the automated installation of the necessary drivers by Windows OS.
* Wireless Connection
There is another connecting option which keeps the headphones free of any cables between themselves and a Windows PC - Bluetooth wireless connection. If your headphones are tangle-free, connect them to your PC via Bluetooth.
You May Also Like:
Full Instructions: How to Use TWS Bluetooth Earbuds
How to Connect Bluetooth Earbuds to Work with Your Phone
STEP 2. Make Sure Your Headphones' Volume Is Turned up
Now in order to make the follow-up headphone test go with a swing, you should check if your headphones are muted or not. If they are, switch up the volume on the headphone's cable or earpiece.
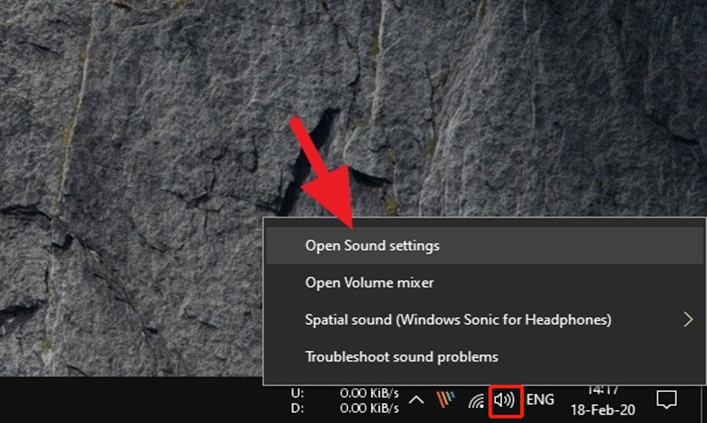
STEP 3. Open the Sound Control Panel on Your PC
Now it's time to test whether your Windows PC picks up any audio from your headphones. The test processes are all carried out in the Sound Control Panel on your PC. So open the Sound Control Panel first by simply right-clicking the speaker icon on the bottom right of your taskbar.
Note:
If you cannot see the speaker icon on the taskbar, find it in the hidden icon section.
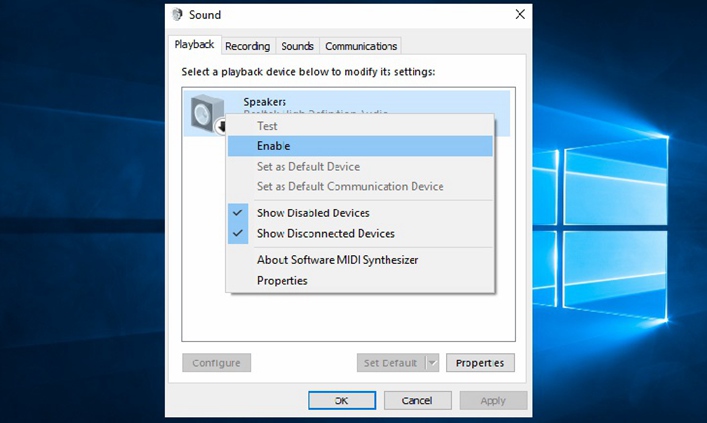
STEP 4. Enable Your Headphones on the Playback Tab
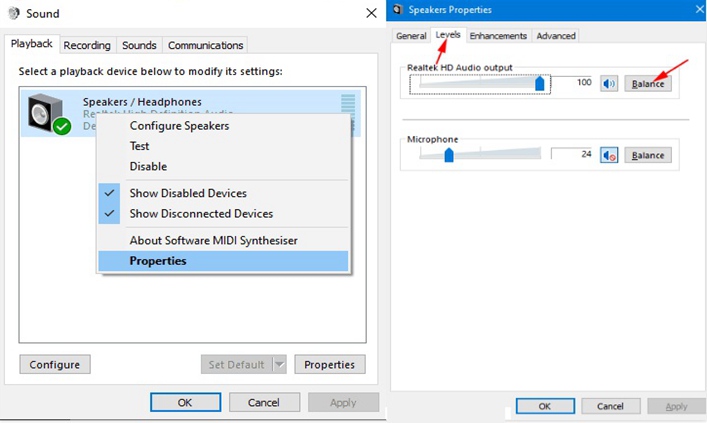
On the Sound Control Panel, select "Playback". Then on the Playback tab, you can see a list of audio devices which are connected to your PC. Now right-click an empty place from the tab's devices list and choose "Show Disabled Devices" from the pop-up window to view all the disabled devices.
Then all you need to do is right-click your headphones icon and tap "Enable" from the pop-up menu. After that, right-click the icon again to ensure your headphones are enabled. If now you see the "Disable"option rather than "Enable", you've already enabled your headphones on your PC.
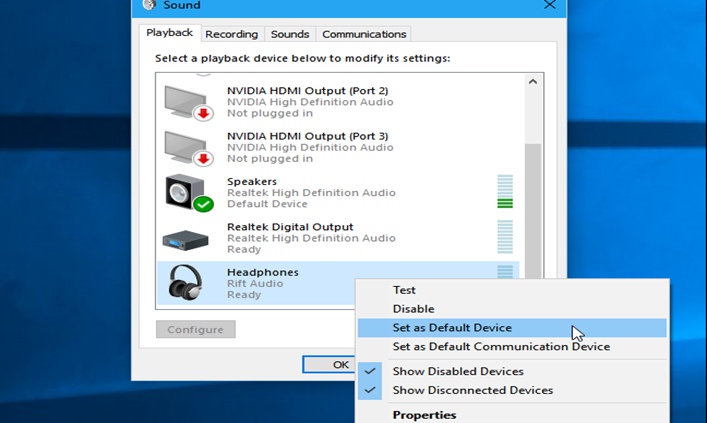
STEP 5. Set Your Headphones as Default Device
After enabling your headphones on your PC, on the Playback tab, make sure your headphones are set as the default device. If you see a check mark on your headphones icon, your headphones have already been chosen as the default device. If they haven't, you need to right-click the headphones icon and select "Set As Default Device".
STEP 6. Drag the Volume Slider to the Right on Levels Tab
Now right-click your headphones icon and tap properties. Then enter into the "Levels" tab. On "Levels", drag the Volume slider to the right to increase the sound volume. Also, if you view a red circle-slash next to the speaker icon, it means your headphones device is muted. To turn off the mute mode, just click the speaker icon. Then click "OK".
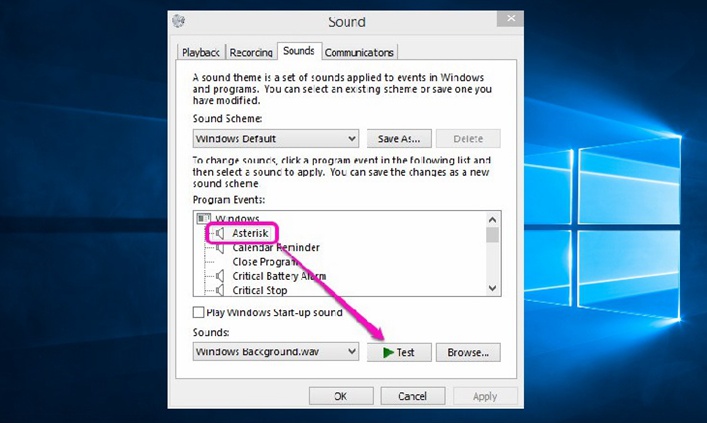
STEP 7. Test Any Program Event with A Speaker Icon on Sounds Tab
After ensuring the volume is enabled, now you're able to perform a test on your headphones. To do this, go to the "Sounds" tab, select any program events with a speaker button next to them and tap "Test".
If you can hear the sound through your headphones, you can proceed. Otherwise, your headphones aren't working properly with your PC, which indicates that there may be something wrong with your headphones themselves, the setup or your PC. Facing headphone not working problem, you need to figure out the source of the issue and find a proper way to fix it.
How to Perform A Microphone Test on Your Windows PC
After doing a headphone test and ensuring your headphones are working with your PC, you should also check if your microphone is working properly on your PC before making an audio conversation. Whether you're going to test a single external microphone device or a microphone from a headset, the test processes are the same. There are two major ways by which you can do a microphone test:
Method 1. Do A Microphone Test with the Sound Control Panel
Just like the headphone test done on the Sound Control Panel, you can also check if your microphone is properly working with your PC from the control panel.
Step 1. Connect Your Microphone to Your Windows PC
You should start by connecting your microphone to your PC. If your microphone comes with an audio jack, plug it into the sound card microphone port on your PC. If you have a USB microphone which has its own driver software, you'll need to install the driver first and then insert the microphone into the USB port on your PC.
If your microphone is Bluetooth-powered, you should pair it with your WIndows PC with no cable. Of course, if you use a pair of headset, just connect it to your PC to test its microphone.
Step 2. Make Sure Your Microphone Isn't Muted
A large number of microphone devices today support mute function so you really need to be sure the function is disabled. If you use a headset, you should also verify that the microphone is set for use with volume.
Step 3. Open the Sound Control Panel and Enable Your Microphone
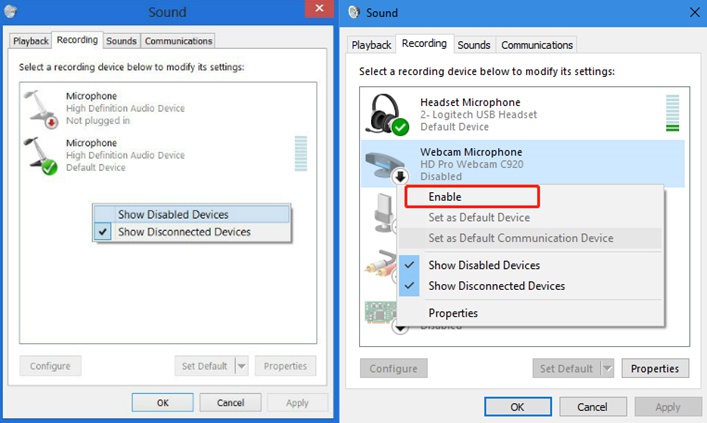
Much like enabling your headphone in the above headphone test section, you should firstly open the Sound Control Panel by right-clicking the speaker icon on the taskbar and go to "Recording" tab. Then see all the disabled microphone devices by right-clicking an empty area and choosing "Show Disabled Devices" from the pop-up window.
After that, right-click your microphone button and select "Enable" to enable it on your PC.
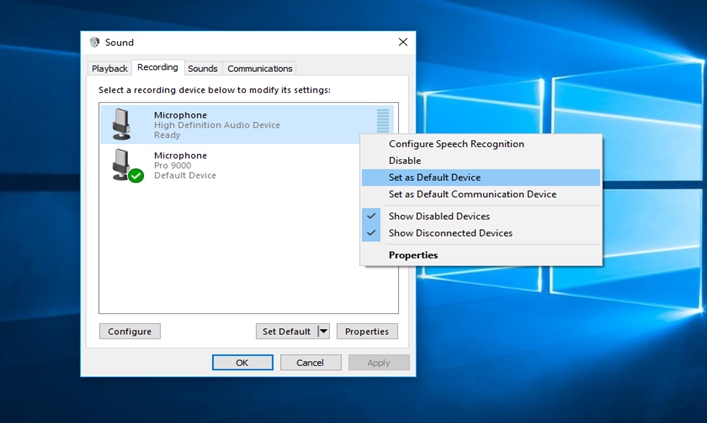
Step 4. Set Your Microphone as Default Device
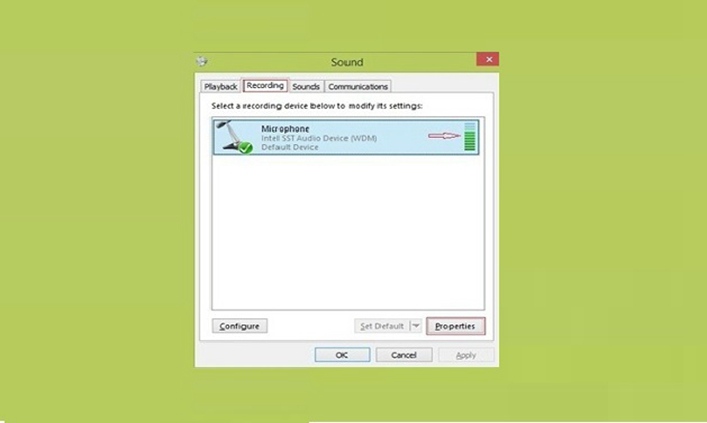
The next step is to ensure that your microphone is set as the default device. On the Recording tab, if a check mark appearing on your microphone icon, it means your microphone's already selected as the default device. Otherwise, right-click your microphone and tap "Set as Default Device" to set it as the default.
Step 5. Verify the Volume Is Turned up on Levels Tab
Now go to the Levels > Properties by double-clicking your microphone icon to verify the volume is enabled. To do this, drag the volume slider to the right and make sure there isn't a red slash on the speaker button. Then click "OK".
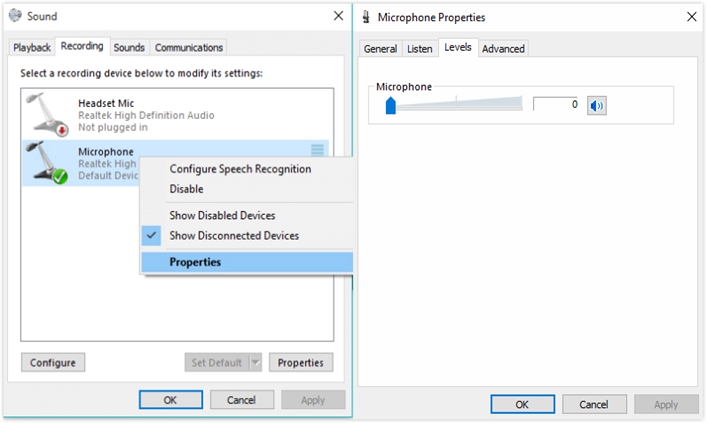
Step 6. Test Your Microphone on the Recording Tab
Different from the headphone test which is finished on the "Sounds" tab, testing your microphone only requires you to speak into your microphone and watch the vertical volume bar located to the right of the microphone line on the "Recording Tab".
If the level bar turns green as you speak into the microphone, the microphone is picking up audio and you're good to go. However, if there is no change on the bar no matter how loudly you speak into the microphone, your mic isn't working with your PC.
Method 2. Test Your Microphone Using Microsoft Sound Recorder
If you want to test your headphone mic or single microphone more easily, you can actually use Microsoft Sound Recorder. It's the sample recorder on Windows where you can speak into your microphone and record sound. Hence, it can be also utilized to test if a microphone is working properly.
The test is very easy and simple. You should start by installing the sound recorder. Here's the operation:
Start->Programs->Accessories->Multimedia->Sound Recorder
Then on the main interface of the recorder, press the Record button with the red circle to start recording and speak into the microphone. After that, stop the recording and play it back by tapping "Play". If you can hear your voice on the playback, your microphone works. If not, something is wrong with your microphone or your PC.

Troubleshooting Tips on Headphone and Mic Not Working Issues
If your headphones and microphone are found not working properly with your PC after the test, it can lie with the headphones and the microphone themselves or your PC. Don't panic though. There are some fixes you can try to uncover your headphone and microphone not working problems. Just remember to identify the reason of the issue first and then try the solutions until your headphones and mic are properly working.
Run Windows Troubleshooter
If you can't identify the reason for not-working issue after the headphone test or mic test, try using Windows built-in troubleshooter which can be accessed by right-clicking the speaker icon in the taskbar and select "Troubleshoot sound problems". This tool allows Windows to identify the potential reasons of the not-working issues and search for potential solutions.
Check the Connections
If your headphones or microphone cannot work properly with your PC after the test but can work with other devices, then the issue could be in the connections. Check if you use the right port on your PC and try using a new connector cable if possible.
If your headphones or microphone or both are Bluetooth-enabled, the signal of the Bluetooth can be easily interfered with other Bluetooth connections. Hence, you can disable Bluetooth on any other connections to see if that helps.
Re-installing the Hardwave Drivers
If you can see your headphones and microphone listed in the Windows Device Manager (which means they can be detected by your PC) but they still don't work during the microphone and headphone test, the problem may be in the drivers.
Headphones and microphones which come with USB always require installing additional drivers on your PC. So if they aren't working with your PC, try reinstalling the drivers on Windows to see if that helps.
Select Different Formats for Input/Output
If you still cannot fix anything, try changing the format for input/output. To change the format for your headphones, go to Recording tab on the Sound Settings, right-click your headphones icon and go to Advanced > Properties. To select a different format for your microphone, go to Advanced > Properties on the Sounds tab.
Check Your Apps Permission/Settings
There is also a situation that your headphones and mic can work properly with your PC after the test but aren't working with a specific app. Under this circumstance, the problem lies with the app.
To deal with this problem, you can first make sure the app has permission to get access to your headphones and microphone. If this cannot still fix the issue, check the app settings to see if there is any unavailability setting for the audio input and output.
Conclusion
Performing a microphone and headphone test prior to an audio conversation on your Windows PC is of great necessity as this can check if your headphones and microphone are working properly with your PC. Both the headphone test and the microphone test are easy and simple to perform.
Follow the instructions above and the troubleshooting tips on headphones and mic not working issues, you can ensure both your headphones and microphone are properly working. Hope this article can give you any help!